This post is about to create a macro in Microsoft excel
If you have tasks in Microsoft Excel that you do repeatedly, you can record a macro to automate those tasks. A macro is an action or a set of actions that you can run as many times as you want. When you create a macro, you are recording your mouse clicks and keystrokes. After you create a macro, you can edit it to make minor changes to the way it works.
Suppose that every month, you create a report for your accounting manager. You want to format the names of the customers with overdue accounts in red, and also apply bold formatting. You can create and then run a macro that quickly applies these formatting changes to the cells you select.
Table of Contents
Create a macro in Microsoft Excel
Before you record a macro
Macros and VBA tools can be found on the Developer tab, which is hidden by default, so the first step is to enable it. Even the Developer Category is hidden in our menu too.
Show the Developer tab
The Developer tab isn't displayed by default, but you can add it to the ribbon.1. On the File tab, go to Options > Customize Ribbon.2. Under Customize the Ribbon and under Main Tabs, select the Developer check box.
After you show the tab, the Developer tab stays visible, unless you clear the check box or have to reinstall a Microsoft Office program.
The Developer tab is the place to go when you want to do or use the following:1. Write macros.2. Run macros that you previously recorded.3. Use XML commands.4. Use ActiveX controls.5. Create applications to use with Microsoft Office programs.6. Use form controls in Microsoft Excel.7. Work with the ShapeSheet in Microsoft Visio.8. Create new shapes and stencils in Microsoft Visio.

Record a macro
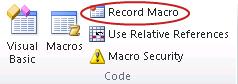
In the Code group on the Developer tab, click Record Macro.
Optionally, enter a name for the macro in the Macro name box, enter a shortcut key in the Shortcut key box, and a description in the Description box, and then click OK to start recording.
Perform the actions you want to automate, such as entering boilerplate text or filling down a column of data.
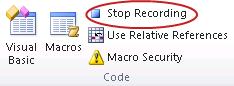
On the Developer tab, click Stop Recording.
Take a closer look at the macro
You can learn a little about the Visual Basic programming language by editing a macro.
To edit a macro, in the Code group on the Developer tab, click Macros, select the name of the macro, and click Edit. This starts the Visual Basic Editor.
See how the actions that you recorded appear as code. Some of the code will probably be clear to you, and some of it may be a little mysterious.
Experiment with the code, close the Visual Basic Editor, and run your macro again. This time, see if anything different happens!
Automate tasks with the Macro Recorder
To automate a repetitive task, you can record a macro with the Macro Recorder in Microsoft Excel. Imagine you have dates in random formats and you want to apply a single format to all of them. A macro can do that for you. You can record a macro applying the format you want, and then replay the macro whenever needed.
When you record a macro, the macro recorder records all the steps in Visual Basic for Applications (VBA) code. These steps can include typing text or numbers, clicking cells or commands on the ribbon or on menus, formatting cells, rows, or columns, or even importing data from an external source, say, Microsoft Access. Visual Basic Application (VBA) is a subset of the powerful Visual Basic programming language, and is included with most Office applications. Although VBA gives you the ability to automate processes within and between Office applications, it is not necessary to know VBA code or computer programming if the Macro Recorder does what you want.
It is important to know that you when you record a macro, the Macro Recorder captures almost every move you make. So if you make a mistake in your sequence, for example, clicking a button that you did not intend to click, the Macro Recorder will record it. The resolution is to re-record the entire sequence, or modify the VBA code itself. This is why whenever you record something, it’s best to record a process with which you’re highly familiar. The more smoothly you record a sequence, the more efficiently the macro will run when you play it back.
Record a macro
There are a few helpful things you should know about macros:
- When you record a macro for performing a set of tasks in a range in Excel, the macro will only run on the cells within the range. So if you added an extra row to the range, the macro will not run the process on the new row, but only the cells within the range.
- If you have planned a long process of tasks to record, plan to have smaller relevant macros instead of having one long macro.
- It is not necessary that only tasks in Excel can be recorded in a macro. Your macro process can extend to other Office applications, and any other applications that support Visual Basic Application (VBA). For example, you can record a macro where you first update a table in Excel and then open Outlook to email the table to an email address.
Follow these steps to record a macro.
- On the Developer tab, in the Code group, click Record Macro. -OR- Press Alt+T+M+R
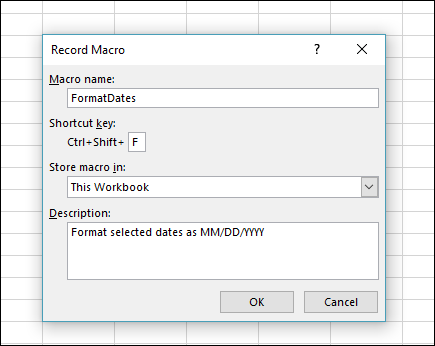
- In the Macro name box, enter a name for the macro. Make the name as descriptive as possible so you can quickly find it if you create more than one macro.
Note: The first character of the macro name must be a letter. Subsequent characters can be letters, numbers, or underscore characters. Spaces cannot be used in a macro name; an underscore character works well as a word separator. If you use a macro name that is also a cell reference, you may get an error message that the macro name is not valid.
- To assign a keyboard shortcut to run the macro, in the Shortcut key box, type any letter (both uppercase or lowercase will work) that you want to use. It is best to use Ctrl + Shift (uppercase) key combinations, because the macro shortcut key will override any equivalent default Excel shortcut key while the workbook that contains the macro is open. For instance, if you use Ctrl+Z (Undo), you will lose the ability to Undo in that Excel instance.
- In the Store macro in list, select where you want to store the macro.
In general, you’ll save your macro in the This Workbook location, but if you want a macro to be available whenever you use Excel, select Personal Macro Workbook . When you select Personal Macro Workbook, Excel creates a hidden personal macro workbook (Personal.xlsb) if it does not already exist, and saves the macro in this workbook.
- In the Description box, optionally type a brief description of what the macro does.
Although the description field is optional, it is recommended you enter one. Also, try to enter a meaningful description with any information that may be useful to you or other users who will be running the macro. If you create a lot of macros, the description can help you quickly identify which macro does what, otherwise you might have to guess.
- Click OK to start recording.
- Perform the actions that you want to record.
- On the Developer tab, in the Code group, click Stop Recording. -OR- Press Alt+T+M+R .
Working with recorded macros in Excel
In the Developer tab, click Macros to view macros associated to a workbook. Or press Alt+ F8. This opens the Macro dialog box.
Caution: Macros cannot be undone. Before you run a recorded macro for the first time, make sure that you’ve either saved the workbook where you want to run the macro, or better yet work on a copy of the workbook to prevent unwanted changes. If you run a macro and it doesn’t do what you want, you can close the workbook without saving it.
Run a macro
There are several ways to run a macro in Microsoft Excel. A macro is an action or a set of actions that you can use to automate tasks. Macros are recorded in the Visual Basic for Applications programming language. You can always run a macro by clicking the Macros command on the Developer tab on the ribbon. Depending on how a macro is assigned to run, you might also be able to run it by pressing a combination shortcut key, by clicking a button on the Quick Access Toolbar or in a custom group on the ribbon, or by clicking on an object, graphic, or control. In addition, you can run a macro automatically whenever you open a workbook.
Before you run macros
Before you start working on macros you should enable the Developer tab.
- For Windows, go to File > Options > Customize Ribbon.
- For Mac, go to Excel > Preferences… > Ribbon & Toolbar.
- Then, in the Customize the Ribbon section, under Main Tabs, check the Developer check box, and press OK.
Run a macro from the Developer tab
- Open the workbook that contains the macro.
- On the Developer tab, in the Code group, click Macros.
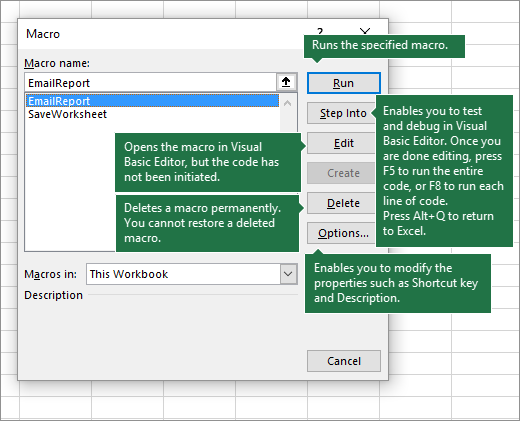
- In the Macro name box, click the macro that you want to run, and press the Run button.
- You also have other choices:
- Options – Add a shortcut key, or a macro description.
- Step – This will open the Visual Basic Editor to the first line of the macro. Pressing F8 will let you step through the macro code one line at a time.
- Edit – This will open the Visual Basic Editor and let you edit the macro code as needed. Once you’ve made changes, you can press F5 to run the macro from the editor.
Run a macro by pressing combination shortcut key
You can add a combination shortcut key to a macro when you record it, and you can also add one to an existing macro:
- On the Developer tab, in the Code group, click Macros.
- In the Macro name box, click the macro that you want to assign to a combination shortcut key.
- Click Options. The Macro Options dialog box appears.
- In the Shortcut key box, type any lowercase or uppercase letter that you want to use with the shortcut key.
Notes:
1. For Windows, the shortcut key for lowercase letters is Ctrl+letter. For uppercase letters, it's Ctrl+Shift+Letter.

2. For Mac, the shortcut key for lowercase letters is Option+Command+letter, but Ctrl+letter will work as well. For uppercase letters, it's Ctrl+Shift+Letter.

3. Be careful assigning shortcut keys, because they will override any equivalent default Excel shortcut key while the workbook that contains the macro is open. For example, if you assign a macro to Ctrl+z, you'll lose the ability to Undo. Because of this, it's generally a good idea to use Ctrl+Shift+Uppercase letter instead, like Ctrl+Shift+Z, which doesn't have an equivalent shortcut in Excel.
- In the Description box, type a description of the macro.
- Click OK to save your changes, and then click Cancel to close the Macro dialog box.
Run a macro by clicking a button on the Quick Access toolbar
To run a macro from a button on the Quick Access toolbar, you first have to add the button to the toolbar.
Add a macro button to the Quick Access Toolbar
1. Click File > Options > Quick Access Toolbar.
2. In the Choose commands from list, click Macros.
3. Select the macro you want to assign a button to.
4. Click Add to move the macro to the list of buttons on the Quick Access Toolbar.
5. To replace the default macro icon with a different button for your macro, click Modify.
6. Under Symbol, select a button icon for your macro.
7. To use a friendlier name for the button, in the Display name box, enter the name you want. You can enter a space in the button name.
8. Click OK twice.

The new button appears on the Quick Access Toolbar, where you can click it to run the macro.

Tip: When you save the workbook, buttons you assign to macros in the personal workbook will be available in every workbook you open.
Run a macro by clicking a button in a custom group that appears on a tab in the ribbon
You can create a custom group that appears on a tab in the ribbon, and then assign a macro to a button in that group. For example, you can add a custom group named “My Macros” to the Developer tab, and then add a macro (that appears as a button) to the new group.
Add a macro button to your own group on the ribbon
1. Click File > Options > Customize Ribbon.
2. Under Customize the Ribbon, in the Main Tabs list, check the Developer box if it is not already checked.
3. Pick the tab where you want to add your own group.
    For example, pick Home, to add your group to the Home tab.
4. Select New Group.
    That adds New Group (Custom) to the tab you picked.
5. To use a better name for your new group, click Rename, type the name you want in the Display name box, and then click OK.
    You can enter a space in the name. For example, type My Macros.
6. To add a macro to the group, in the Choose commands from list, click Macros.
7. Select the macro you want to add to your new group, and then click Add. The macro is added to the My Macros group.
8. To use a friendlier name, click Rename, and then type the name you want in the Display name box.
You can enter a space in the name.
9. Under Symbol, select a button icon for your macro.
10. Click OK twice.

Your new group appears on the tab you picked, where you can click the button to run the macro.

Tip: When you save the workbook, buttons you assign to macros in the personal workbook will be available in every workbook you open.
Run a macro by clicking an area on a graphic object
You can create a hotspot on a graphic that users can click to run a macro.
- In the worksheet, insert a graphic object, such as a picture, or draw a shape. A common scenario is to draw a Rounded Rectangle shape, and format it so it looks like a button.
- Right-click the hotspot that you created, and then click Assign Macro.
- Do one of the following:
- To assign an existing macro to the graphic object, double-click the macro or enter its name in the Macro name box.
- To record a new macro to assign to the selected graphic object, click Record, type a name for the macro in the Record Macro dialog box, and then click OK to begin recording your macro. When you finish recording the macro, click Stop Recording on the Developer tab in the Code group.
- To edit an existing macro, click the name of the macro in the Macro name box, and then click Edit.
Tip: You can also click Stop Recording on the left side of the status bar.
- Click OK.
Run a macro from the Visual Basic Editor (VBE)
On the Developer tab, click Visual Basic to launch the Visual Basic Editor (VBE). Browse the Project Explorer to the module that contains the macro you want to run, and open it. All of the macros in that module will be listed in the pane on the right. Select the macro you want to run, by placing your cursor anywhere within the macro, and press F5, or on the menu, go to Run > Run Macro.
Configure a macro to run automatically upon opening a workbook
Create a Workbook_Open event.
The following example uses the Open event to run a macro when you open the workbook.
- Open the workbook where you want to add the macro, or create a new workbook.
- On the Developer tab, in the Code group, click Visual Basic.
- In the Project Explorer window, right-click the ThisWorkbook object, and then click View Code. Tip: If the Project Explorer window is not visible, on the View menu, click Project Explorer.
- In the Object list above the Code window, select Workbook. This automatically creates an empty procedure for the Open event, such as this:
Private Sub Workbook_Open()

End Sub - Add the following lines of code to the procedure:
Private Sub Workbook_Open()
MsgBox Date
Worksheets("Sheet1").Range("A1").Value = Date
End Sub - Switch to Excel and save the workbook as a macro-enabled workbook (.xlsm).
- Close and reopen the workbook. When you open the workbook again, Excel runs the Workbook_Open procedure, which displays today’s date in a message box.
- Click OK in the message box.
Note: The cell A1 on Sheet1 also contains the date as a result of running the Workbook_Open procedure.
Keywords
- Create a macro in Microsoft Excel
- Run a macro in Microsoft Excel
Read Also
1. Excel Functions related to Date and Time
2. Excel DATE Function – Syntax and Use
3. How to Create a Histogram in Excel (Step-by-Step Guide)
4. Add different page numbers or number formats to different sections
5. Useful Excel Keyboard Shortcuts and Function Keys for Windows
Thanks for reading Create a macro in Microsoft Excel, if you have any doubt, feel free to write in the comment section.