
You can use data validation to restrict the type of data or the values that users enter into a cell. One of the most common data validation uses is to create a drop-down list.
Before the start, do have a look on “What’s new in Excel 2019 for Windows“
Table of Contents
To Apply data validation to cells in Microsoft Excel
1. Select the cell(s) you want to create a rule for.
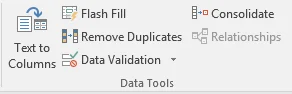
2. Select Data >Data Validation.
3. On the Settings tab, under Allow, select an option:
- The whole Number – to restrict the cell to accept only whole numbers
- Decimal – to restrict the cell to accept only decimal numbers
- List – to pick data from the drop-down list
- Date – to restrict the cell to accept the only date
- Time – to restrict the cell to accept only time
- Text Length – to restrict the length of the text
- Custom – for custom formula.
4. Under Data, select a condition:
- between
- not between
- equal to
- not equal to
- greater than
- less than
- greater than or equal to
- less than or equal to
5. On the Settings tab, under Allow, select an option
Read Also: Conditional Formatting in Microsoft Excel to Highlight the Information
6. Set the other required values, based on what you chose for Allow and Data. For example, if you select between, then select the Minimum: and Maximum: values for the cell(s).
7. Select the Ignore blank checkbox if you want to ignore blank spaces.
8. If you want to add a Title and message for your rule, select the Input Message tab, and then type a title and input message.
9. Select the Show input message when the cell has selected the checkbox to display the message when the user selects or hovers over the selected cell(s).
10. Select OK.
Now, if the user tries to enter a value that is not valid, a pop-up appears with the message, “This value doesn’t match the data validation restrictions for this cell.”
In the example worksheet, following data validation are defined
| Worksheet | Data Validation Type |
| Whole number | Limit entries to whole numbers |
| Decimal | Limit entries to decimal (percentage) values |
| Departments | Limit selections to list choices |
| Cost centres table | Table for Cost centre list source |
| Cost centre budget | Limit selections to Cost centre list choices |
| Date | Limit entries to dates within a range |
| Time | Limit entries between a time frame |
| Text length | Limit entries to a certain number of characters |
| HR Budget | Limit entries to a certain maximum amount |
| Products | Require entries to meet certain text guidelines |
| Age verification | Limit entries below a certain age |
| Custom values | Limit entries to unique values only (no repeated entries) |
| Require entries to contain the @ symbol |
Want to try these examples yourself? Use the Download Companion Practice Sheet button below this post to get the free practice workbook.
If you have any doubt, feel free to contact.
Read Also:
Download the practice workbook
The same data as this tutorial, with empty answer cells and a Solutions sheet.

[…] Read also: How to Apply data validation to cells in Microsoft Excel […]